
- Requirements
- Installation
- Configuration
- Extracting terminologies
- Navigating the terminology results
- Running alignment
- Editing linguistic Resources from the interface
- Enjoy TermSuite
Requirements
Choose a directory on your cimpouter where you have decided to install TermSuite and its dependencies. In the remaining of this guide, we refer to this place à TERMSUITE_WORKSPACE.
TermSuite has a graphical user-interface that you can download and run ony our OS (Linux, Mac OS, and Windows). Before that, you need to install:
Installation
Installation of Java
Make sure you have Java installed on your OS (at least version 8), or follow the official installation instructions.
To check if Java is installed properly and see its current version, open a command line prompt and type:
$ java -version
Installation of TreeTagger
To install TreeTagger on your OS: (See the install instructions for details)
1. Download TreeTagger from the official site to TERMSUITE_WORKSPACE and uncompress it.
2. Creates a subdirectory named models within the TreeTagger directory.
3. Download to dir models/ the english utf-8-encoded (very important) model from the official site and rename it to english.par.
Encoding and naming of TreeTagger models is important for TermSuite to run correctly. See detailed instructions for all languages.
Prepare your corpora
The corpora must have a very specific directory architecture. Each corpus is a directory having:
- one child directory per language (allowed names are
French,English, etc) - each language directory must have a
txt/directory as child. All*.txtfiles within thetxt/directory will be considered as a document to analyze.
As an example, download the example multilingual corpus Wind Energy to TERMSUITE_WORKSPACE, uncompress it, and see its directory architecture:
wind-energy/
  English/
    txt/
      file1.txt
      file3.txt
      [...]
      file38.txt
  French/
    txt/
      file1.txt
      ...
  [...]
Download TermSuite
Download the last stable version of TermSuite’s Graphical User Interface and unzip the file to TERMSUITE_WORKSPACE/.
Start TermSuite
Start TermSuite by double-clicking on TermSuite’s executable within the TERMSUITE_WORKSPACE/fr.univnantes.termsuite-[your-os]/ directory (TERMSUITE_WORKSPACE/Eclipse.app for Mac OS).
| Your OS | Name of TermSuite’s executable file |
| Windows | termsuite.exe |
| Mac OS | Eclipse.app |
| Linux | termsuite |
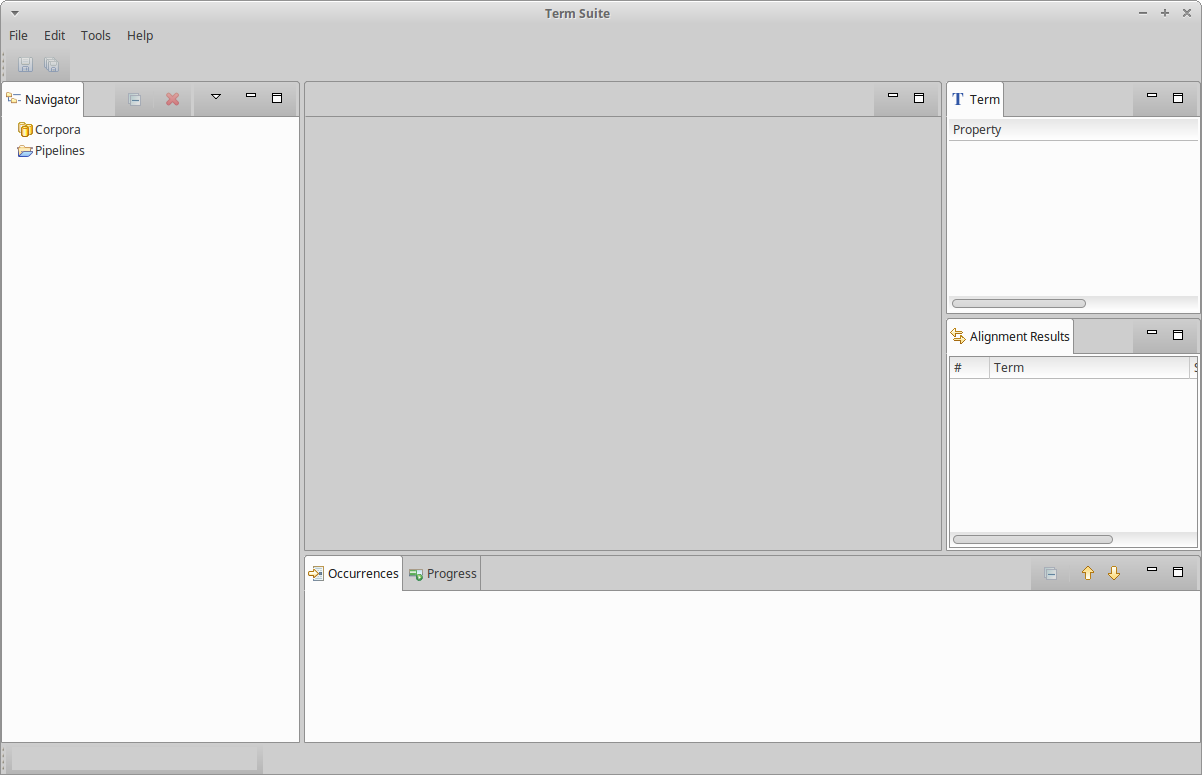
Once launched, the graphical user interface of TermSuite shows up and looks like this:
Configuration
Configuring TreeTagger
The first thing to do is to configure the external location of your TreeTagger directory.
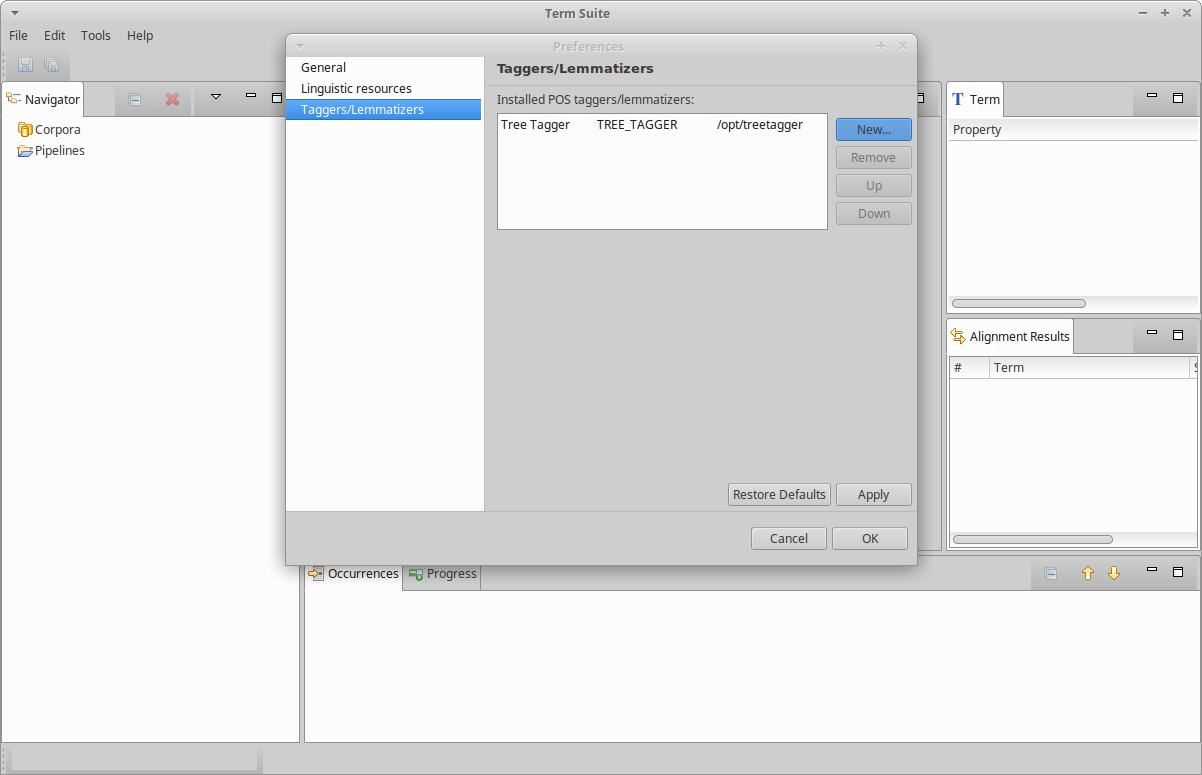
- Go to menu “Edit > Preferences”,
- select the “Taggers/Lemmatizers” pane,
- click “New…”, the window shown below shows up,
- click on button “Browse…” and select the root directory of your local TreeTagger install
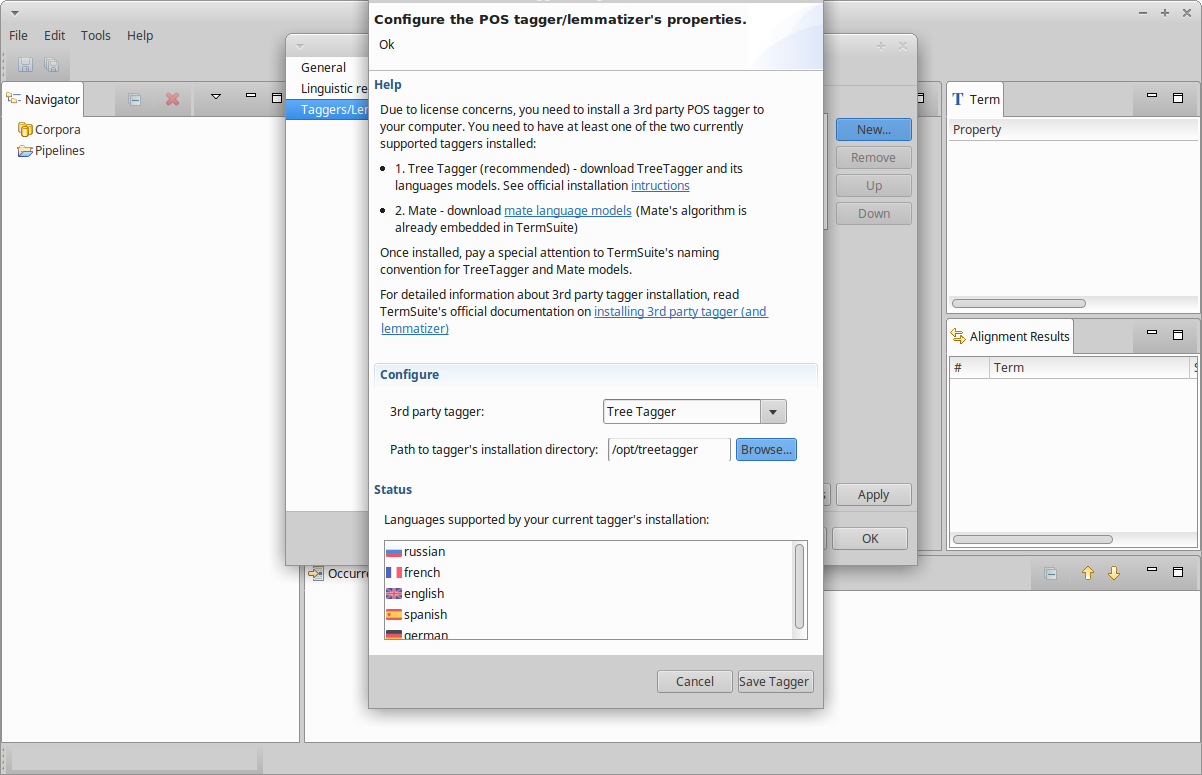
Normally, the flags of all supported languages (at least those you have downloaded the TreeTagger model) should appear.
- Then click on “Save Tagger”:
- And finally click “Ok”.
Import a corpus
- Go to menu “File > Import Corpus…”
- Enter a name of your corpus,
- Click “Browse…” and select the root path of your multilingual comparable corpus, i.e.
TERMSUITE_WORKSPACE/wind-energy/in the context of our guide.
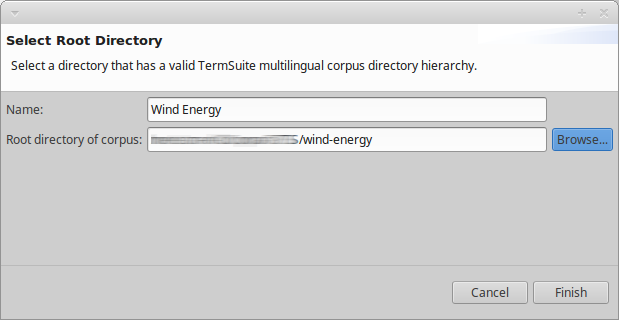
- Click “Finish”
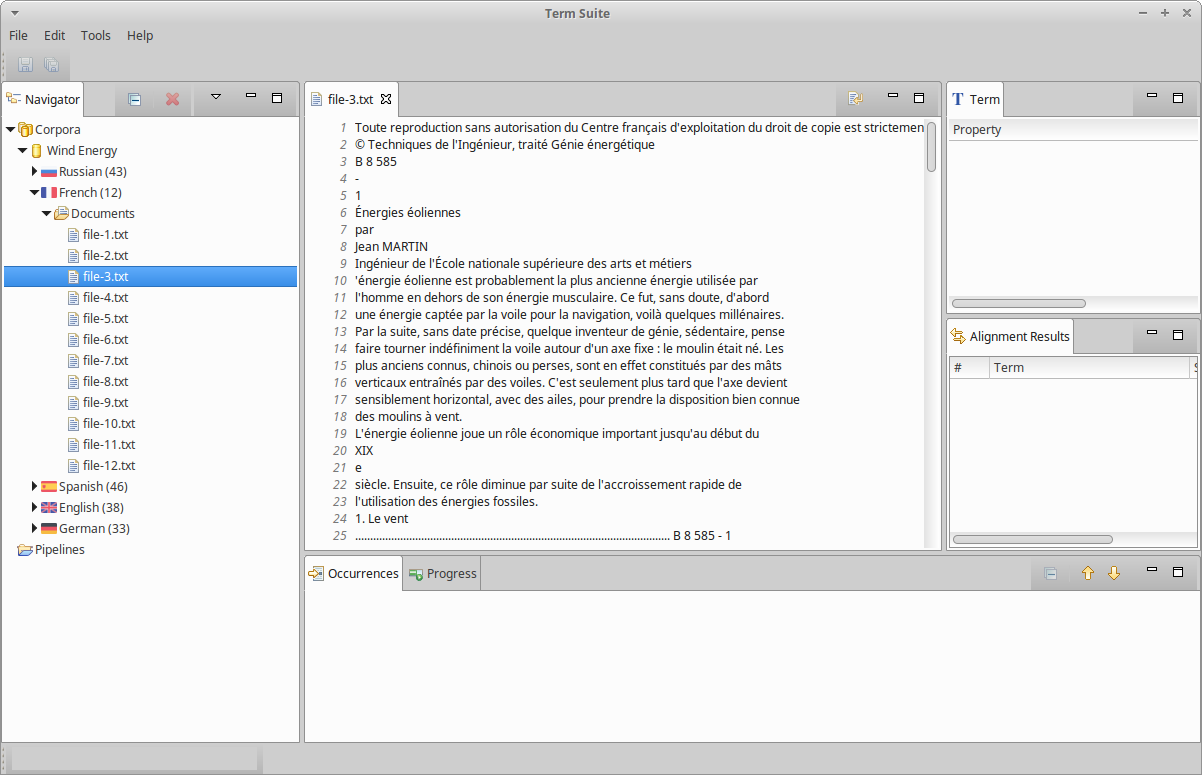
You should be able to navigate documents of the imported corpus in the Navigator part:
Extracting terminologies
Warning: some information in this section might be valid only for version 2 of TermSuite. Current version is 3.0.10.
Creating a pipeline
Extracting terminologies starts with creating a pipeline.
- Go to menu “File > New > New pipeline…”
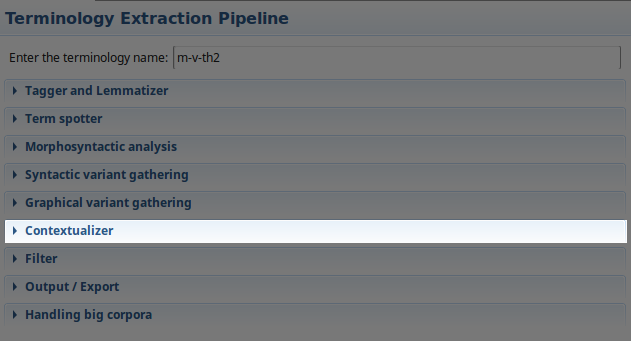
- Give a name to your pipeline, say “m-v-th2” (m for “with morphology”, v for “with variants”, and th2 for “with frequency threshold ≥ 2”)
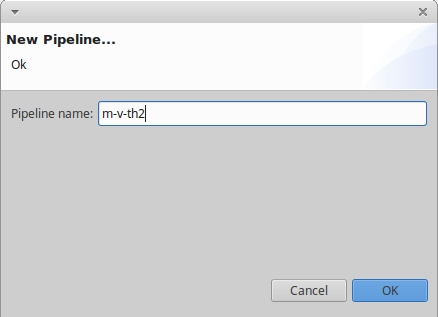
- Click “Ok”, the pipeline editor should show up,
- In the pipeline editor, open the “Morphosyntactic analysis” section and check the “enable morphosyntactic analysis”.
- Save your pipeline with
Ctrl+S.
Running a pipeline
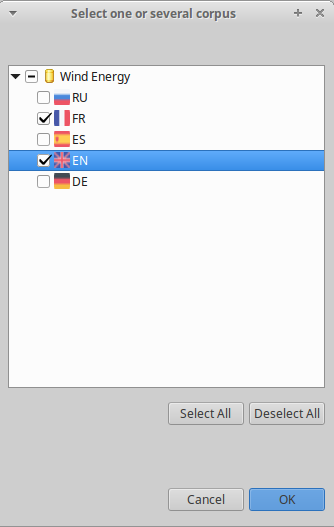
- Open the pipeline to be executed, (it is already open if you have followed this guide),
- Click on the “Start” button [](img/termsuite/run-pipeline.png) on top right of the pipeline editor. A corpus selection dialog shows up,
- Select the corpus you want to run extract terminology from, in this example we select “Wind Energy - fr” and “Wind energy -en”:
- Click “Ok”. The terminology extraction starts and you should see the progress bar in action:
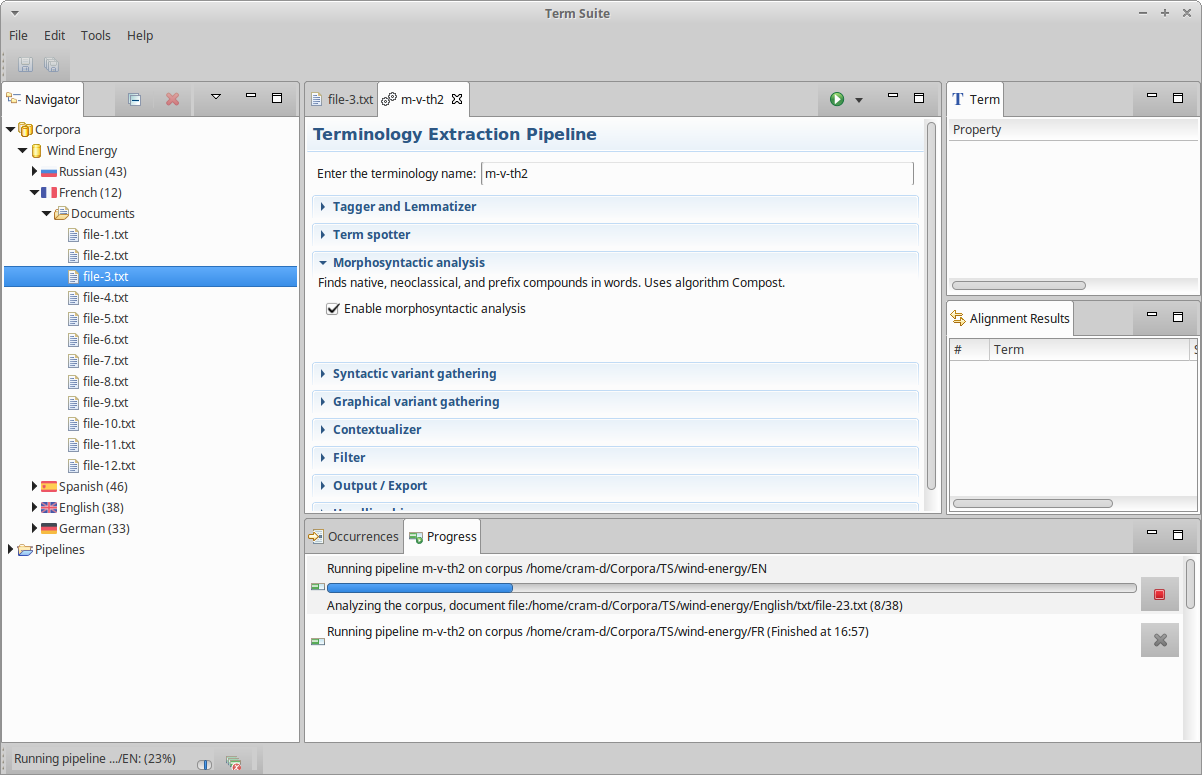
- Once the terminology extraction is over, you should see the terminologies appearing in the Navigator part, under “Corpora > Wind Energy > English > Terminologies” and “Corpora > Wind Energy > French > Terminologies”.
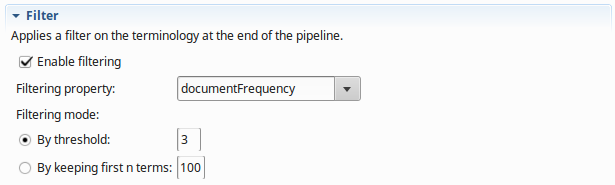
Filtering a terminology
Warning: some information in this section might be valid only for version 2 of TermSuite. Current version is 3.0.10.
Extracted terminologies with no filtering can result in very big terminologies (up to 100,000 terms) while only 500 to 1000 terms often are relevant in terminology extraction. You can configure your pipeline set a term filter.
- Open your pipeline
m-v-th2, - Expand the “Filter” section:

- Check “Enable filtering”,
- Select the term property used for filtering, (See the available term properties)
- Select the filtering mode. There are two filtering mode allowed:
- filtering by threshold keeps term having a value greater or equal than the given threshold,
- filtering by keeping first n terms sorts all terms by the selected property and keeps only the first n.
- Run the pipeline again and the filter will be applied by TermSuite.
Example 1
In the example below, we keep only terms that occur in at least three documents in the corpus:
Example 2
In the example below, we keep only the 500 most specific terms: (Specificty of a term is represented by the wr, wrLog properties)

Exporting a terminology
You can also configure the pipeline to export the extracted terminology in json, tsv, or tbx at the end of the extraction process, by expanding the “Output / Export” section:
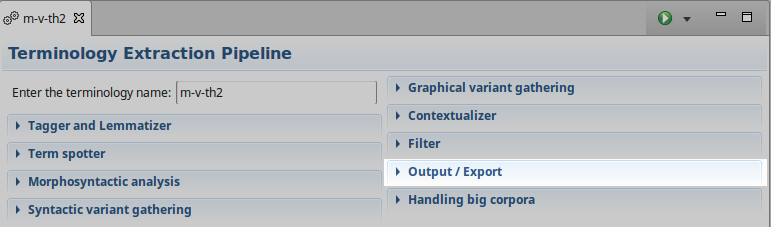
Exported terminologies are located at TERMSUITE_WORKSPACE/termsuite/workspace/output/.
Using the contextualizer
See Section Alignment to learn how to extract terminologies with context vectors for each term.
Navigating the terminology results
Opening the terminology viewer
- In the Navigator part, go to “Corpora > Wind Energy > English > Terminologies”.
- double-click on the terminology named
m-v-th2.
This opens the terminology viewer:
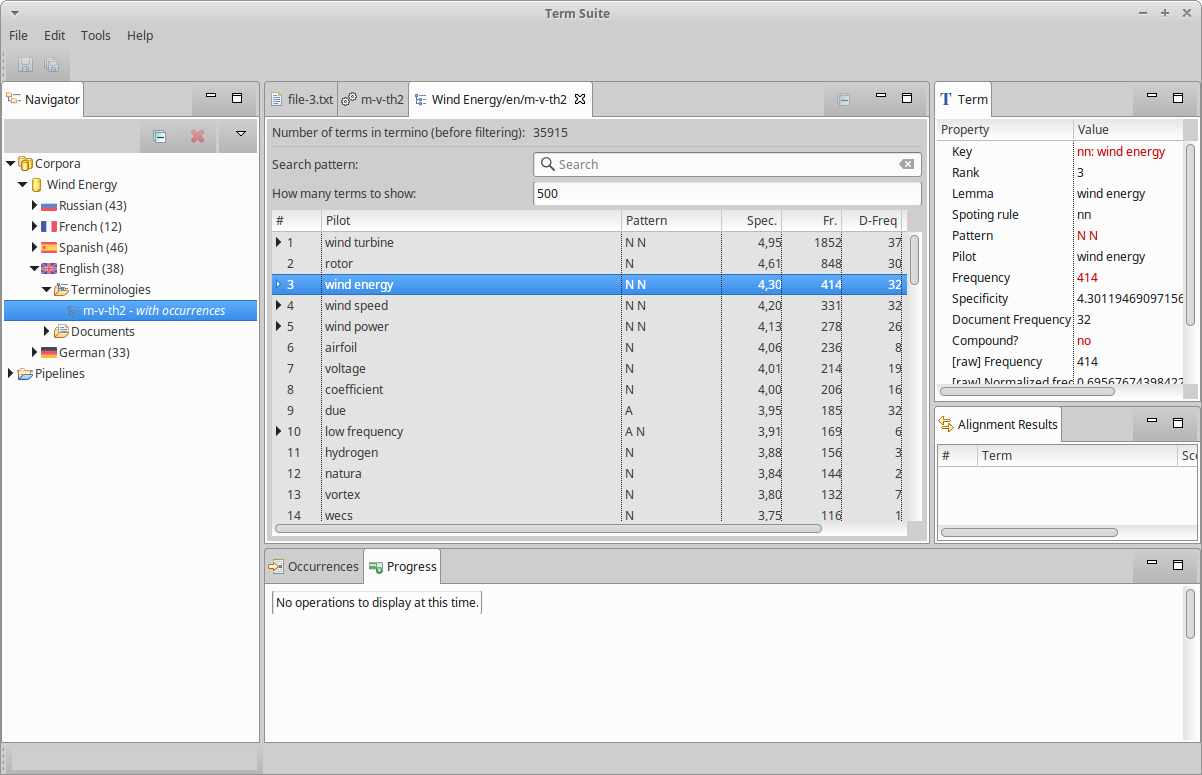
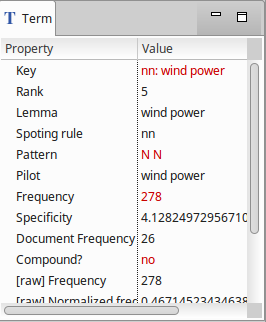
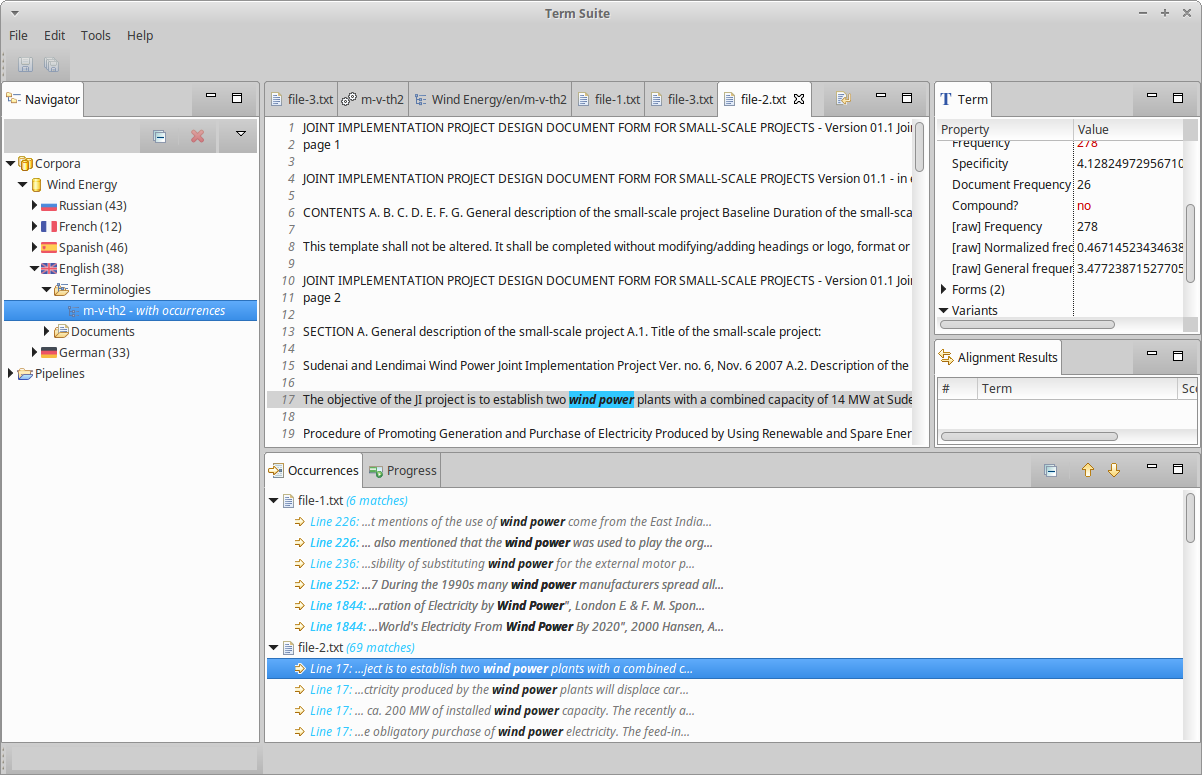
The terminology viewer is a table where each line is an extracted term. Columns show the most relevant properties of the term: its frequency, its specificity, its syntactic pattern, its document frequency, and if the term is a variant, the name of the variation rule. The exhaustive list of the properties of a term can be viewed in the Term part.
Viewing the properties of a term
In the terminology viewer, select the term wind power, or any other term. This updates the Term part on the right of TermSuite’s window with all the properties of the selected term:
Viewing the variants of a term
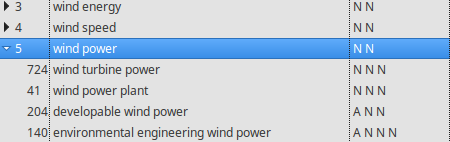
In TermSuite, extracted terms are gathered with their variations (when they exist). In order to navigate all the detected variations of a Term, expand the term line by double-clicking on it.
Viewing the occurrences of a term
By default, a TermSuite pipeline also extracts and stores all the occurrences of an extracted term. This feature allow the user to navigate the occurrence and watch the terms in their context.
To show the occurrences of a term, click on the  tab (near the Progress part
  ). All occurrences of the selected term will appear:
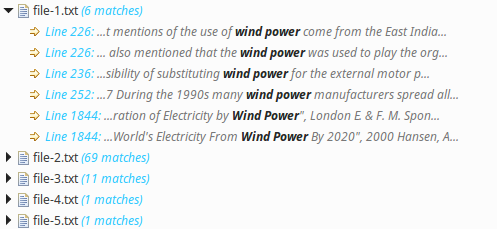
Now, double-clicking on any occurrence will make its container document open with an highlight on the selected occurrence:
Sorting the terms
In the terminology viewer, columns are clickable and update the order of appearance of terms according to the property. In the example below, we have clicked on the “D-Freq” property column:
Filtering the terms
You can limit or increase the number of terms displayed in the terminology viewer with the filter text box:

For performances reasons, it is advised not to show too many terms at a time (500 is a good default value)
Searching terms
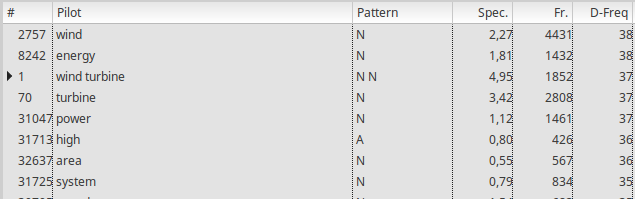
One useful feature of TermSuite UI is the ability to search for terms containing a specific substring.
Example with substring “roto”:
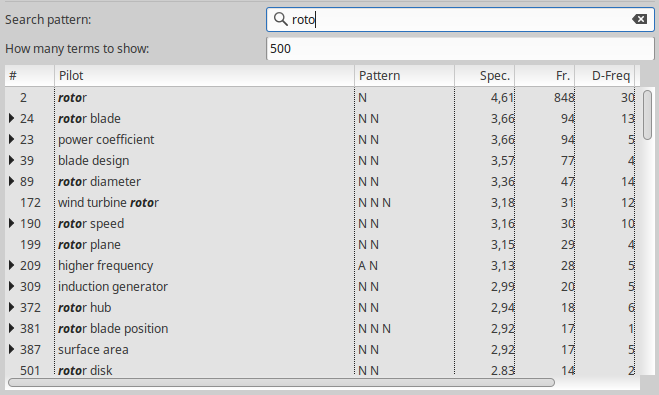
The search also applies on variants and variation rule names, so that it is easy to search for a specific type of variations. For example, searching for substring “M-“ returns all the morphological variants:
Running alignment
Extracting terminologies with context vectors
The first step of multilingual alignement is to extract two terminologies with context vectors for all terms.
- Create a new pipeline named
m-v-th2-contexts, - Enable the morphosyntactic analysis,
- Filter the pipeline by a frequency threshold of 2,
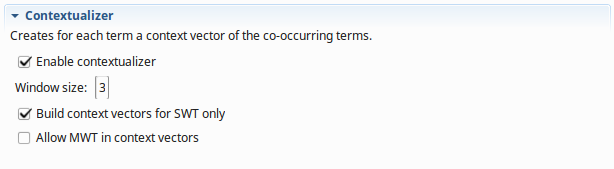
- Open the “Contextualizer” section:
- Check “Enable contextualizer”,
- The window size is the size of the context window for each term, i.e. the number of words included in the context before and after the term. The bigger this window is, the longer will be the alignement process. Set the window size to
3, - Check the “Build context for SWT terms only” option. When checked, the contextualizer will not apply on multi-word terms (MWT), but only on single-word terms (SWT). Deactivating contexts for MWTs is a good practice as the context vectors are often both expansive and useless for MWTs. Indeed, compositional and semi-distributionnal methods (i.e. methods using no context vector or only SWTs’ vectors) very often produce the better results for MWTs.
- Do not check “Allow MWTs in context vectors”. By default, TermSuite only sets SWTs in context vectors. When checked, TermSuite also set MWTs in context vectors, which is expansive. That is why we deactivate it:
- Run the pipeline on corpora “Wind Energy FR” and “Wind Energy EN”. Two
m-v-th2-contextsterminologies having context vectors should appear in the Navigator under “Corpora > Wind Energy > French > Terminologies” and “Corpora > Wind Energy > English > Terminologies”.
Install a bilingual dictionary
The bilingual aligner also requires a bilingual dictionary from the source language to the target language. In TermSuite UI, all bilingual dictionaries must be localted in the same directory and be named as XX-YY.txt, where:
* XX is the source language 2-letter code,
* YY is the target language 2-letter code.
- Download our set of free bilingual dictionaries:
Warning! Be aware that these free dictionaries are not always of good quality. Alignment performances can be significantly improved by using better dictionaries.
- Extract the downloaded dico archive into
TERMSUITE_WORKSPACE/dicos - In TermSuite, go to menu “Edit > Preferences”,
- In the preference dialog, select the tab “Linguistic resources”,
- Click “Browse…” in the field “Location of bilingual dictionaries” and select the directory
TERMSUITE_WORKSPACE/dicos:
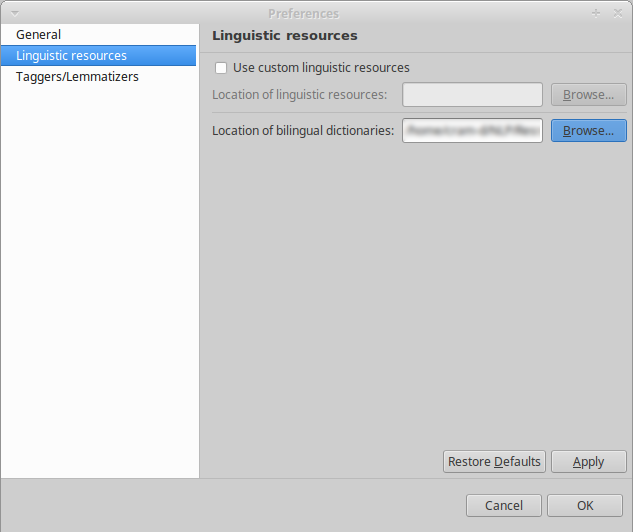
- Click “Ok”.
Aligning terms
You are now ready to align terms.
- In the Navigator part, open the french
m-v-th2-contextsterminology, - In the opened terminology viewer, select the term you need to align,
- Right-click on the term and go to contextual menu “Align > …”. Normally, All the possible target terminology for alignment should appear in the sub-menu: (in our case, only the english
m-v-th2-contextsterminology)

The candidate target terminologies listed in the menu are all terminologies in TermSuite matching the four conditions below: (the terminology in which we have right-clicked is denoted as the source terminology)
- the candidate target terminology belongs to the same comparable corpus as the source terminology (i.e.
Wind Energyin this tutorial), - there exists a bilingual dictionary from the source terminology language to the candidate target rminology,
- the source terminology contains context vectors,
- the candidate target terminology contains context vectors.
- In the “Align >” sub-menu, click on the only candidate target terminology avalaible
m-v-th2-contexts. Alignment is launched and the results appears in the Alignement Results part:
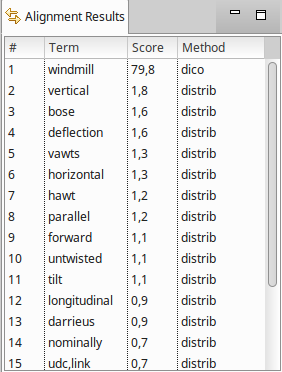
The results are candidate translations scored and ordered. The column method gives the name of the alignment method used to produce the candidate translation. There are currently four alignment methods:
| dico | Dictionary | The candidate translation has been found in the bilingual dictionary |
| distrib | Distributional | (SWT only) The candidate translation comes from the alignment of the source context vector translated |
| comp | Compositional | (MWT only) The candidate translation has been found in target termino by composition of the dictionary translations of the source term’s words |
| semi-distrib | Semi-Distributional | (MWT only) The candidate translation has been found in target termino by combination of one of the source term’s words translated with dico and the other source term’s word aligned with the translated context vector |
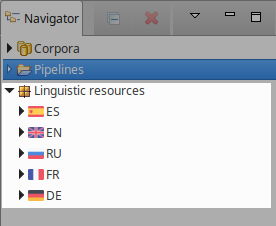
Editing linguistic Resources from the interface
TermSuite’s linguistic resources are mainly rule-based, meaning that they are human readable and can be easily modified. TermSuite UI allows you to edit its linguistic resources so as to customize its behaviour.
In order to see and edit custom linguistic resources:
- Go to menu “Edit > Preferences”,
- Select the “Linguistic resources” pane,
- Check the “Use custom linguistic resources”,
- Click “Browse” on the field labeled “Location of linguistic resources” and select a (preferably) empty directory on your file system.

- Click “Apply” and “Ok”.
All linguistic resources contained in TermSuite are copied to the indicated directory on your file system and any subsequent pipeline execution within TermSuite will use these custom resources. The resources are now editable from within TermSuite:
- Double-click on any resource of any language to open it in a editor, ans save it with “Ctrl+S”.
The most interesting and sensible resources in TermSuite are:
[lang]-multi-word-rule-system.regex: the list of multi-word term spotting rules. Its format is UIMA Tokens Regex,[lang]-variants.yml: the list of term variation rules serialized in YAML.
Enjoy TermSuite
You can now run TermSuite on your own corpora.
Full documentation of available features and options from the command line: command line API.
Embed TermSuite directly to your Java project: Java API.